Contributors

Pages

Powered by Blogger.

Friday, December 15, 2017

A View of a Snowman


Well, it happened again.  It snowed!  That may not sound like a big deal, but when you've spent the last 5 years in the Seattle area, and then you move to Maryland, you get a little excited every time you see snow!  

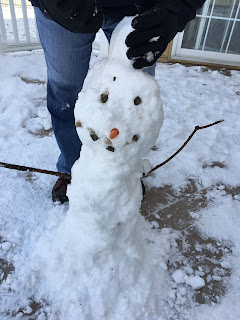
 Last Sunday, we even got enough snow to make a little snowman.  Complete with a baby carrot nose and a bun (hey. . . we have all girls in our house).


And again today, Friday, it snowed!  It has even stayed cold enough all week that our little snowman friend is still there. . . Well, almost. . . 

Seeing our poor little snowman friend reminds me of my all-time favorite snowman art project: 
A View of a Snowman!

I did this project with 4th graders.  I think it would be best for 3-5th.  We started by talking about perspective and point of view in art.  The goal was to draw the same snowman from 2 different perspectives.  I gave each student two 8x8 squares of paper.  I told them to imagine what their snowman looks like, including some details like a scarf, hat, or earmuffs.  Then they got to work drawing with oil pastels.  


This was such a fun project, and the finished products were as unique as the kids were!  


Friday, December 1, 2017

Group Mural Inspired by Kelsey Montague: What Lifts You?


Kelsey Montague is a street artist who creates A W E S O M E  and interactive art.   Kids love it!  Check her out on Instagram at https://www.instagram.com/kelseymontagueart/?hl=en

I decided to do a 5th grade group mural inspired by Kelsey's art, and it turned out so beautiful and colorful!  We displayed it at our Art Walk so that people could take a picture in front of it.  

We started out by looking at Kelsey's artwork.  (Seriously, go follow her on Instagram. . ) We talked about zentangle and the use of patterns and lines to create variety.  Then the fun began!

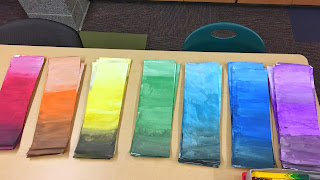
Each 5th grader was given a strip of paper (6x18).  I assigned tables to paint tints and shades of a variety of colors.  Each student then painted the middle of their paper with the color, then mixed the color with white for one end, and black for the other.  The goal was to make an ombre effect. 


After letting the paint dry, each student used a tracer to cut out a feather.  (You could easily have the kids make their own feather, but I made several unique feather tracers for them to make them all about the same size.  I told the kids to make sure the tips of the feather were the dark part.  

Next we rounded up as many white colored pencils as we could find.  White colored pencils are the most under-utilized color, so we were able to round up a lot of them. 

 Each student used white pencil to draw zentangle designs on their feather.  We found that this worked best on the darker colors (of course), and yellow didn't really show the pencil. Oh well! We drew patterns on the yellow anyway!  


Next was the hard part. . . Arranging the feathers to look like giant wings.  I did this by hanging black butcher paper and using spray adhesive to attach the feathers.  The spray adhesive didn't work as well as I hoped, so I had to use tape and/or glue to get them to stick.  If you are hanging the mural onto a wall that can be stapled on, definitely use staples!

And finally the mural was ready to go!  In addition to hanging it at the school for the Art Walk, I took a picture of each 5th grader with it to make a collage for the fifth grade teachers.  

This project was definitely a lot of work, but it was all easy work. :)  And the results were worth it!