Our Kindergarten class had more fun making paper bag puppets and using them with songs and poems. The puppets were made with a small paper bag, just right for a child's arm and hand. Here are some of the puppets we made and the poems we used them with.
Buzz, Buzz, Buzz! Here's a song and a cute little bee Puppet!
This cute butterfly would need to be colored yellow and black!
Ten little kittens, a counting poem. We also have kitten stick puppets.
Five Little Lions! Another counting poem. We have lion stick puppets, too!
These puppets are especially fun because the kids get to make and take! As in home to play with them for hours!
Monday, March 26, 2018
Thursday, March 15, 2018
Class Pointers
One of the best things we did in Kindergarten was make a pointer the children could use to point out words, letters, and phrases. The pointers that I made were from small dowel sticks. I wanted the pointers long enough to reach words on the board or on posters. I also wanted the children to have something fun to 'read the room' with. I got most of my ideas from Dr. Jean Feldman's website, dr.jean.org
The following are some fun ideas:
- Stuff a cotton garden glove with cotton batting, sew three fingers and thumb to the glove and leaving the pointer finger extended.
- Spread glue on the last 3 inches of the stick and roll it in glitter to make a magic wand.
- Tie curly ribbons to the end of the stick to make a princess wand.
- Glue or tape a seasonal toy on the end of the stick. Toys can be changed with the season .
- Use a small, but bright flashlight to highlight the word or phrase.
- Cut a hole in the middle of a new fly swatter to swat and frame the word or letter.
- Get a fake, green witch finger from the novelty store and stick it to the end of the dowel stick for the month of October.
- Tape a bubble wand on the end of the dowel stick.
- Glue glittered hearts on the dowel for February.
- A large wiggly eye glued to the end of the dowel would be fun for the kids to 'see' the word.
- Glue or tape a lion or a lamb on the stick for the month of March. Use the one that pertains to the weather for the day.
Smaller pointers can be made with craft sticks, novelty pencils, wooden spoons and rulers.
As a Kindergarten teacher, I loved making the pointers, and the children loved using them!
Friday, December 15, 2017
A View of a Snowman
Well, it happened again. It snowed! That may not sound like a big deal, but when you've spent the last 5 years in the Seattle area, and then you move to Maryland, you get a little excited every time you see snow!
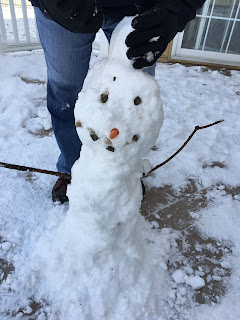
Last Sunday, we even got enough snow to make a little snowman. Complete with a baby carrot nose and a bun (hey. . . we have all girls in our house).
And again today, Friday, it snowed! It has even stayed cold enough all week that our little snowman friend is still there. . . Well, almost. . .
Seeing our poor little snowman friend reminds me of my all-time favorite snowman art project:
A View of a Snowman!
I did this project with 4th graders. I think it would be best for 3-5th. We started by talking about perspective and point of view in art. The goal was to draw the same snowman from 2 different perspectives. I gave each student two 8x8 squares of paper. I told them to imagine what their snowman looks like, including some details like a scarf, hat, or earmuffs. Then they got to work drawing with oil pastels.
This was such a fun project, and the finished products were as unique as the kids were!
Friday, December 1, 2017
Group Mural Inspired by Kelsey Montague: What Lifts You?
Kelsey Montague is a street artist who creates A W E S O M E and interactive art. Kids love it! Check her out on Instagram at https://www.instagram.com/kelseymontagueart/?hl=en
I decided to do a 5th grade group mural inspired by Kelsey's art, and it turned out so beautiful and colorful! We displayed it at our Art Walk so that people could take a picture in front of it.
We started out by looking at Kelsey's artwork. (Seriously, go follow her on Instagram. . ) We talked about zentangle and the use of patterns and lines to create variety. Then the fun began!
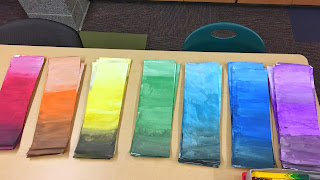
Each 5th grader was given a strip of paper (6x18). I assigned tables to paint tints and shades of a variety of colors. Each student then painted the middle of their paper with the color, then mixed the color with white for one end, and black for the other. The goal was to make an ombre effect.
After letting the paint dry, each student used a tracer to cut out a feather. (You could easily have the kids make their own feather, but I made several unique feather tracers for them to make them all about the same size. I told the kids to make sure the tips of the feather were the dark part.
Next we rounded up as many white colored pencils as we could find. White colored pencils are the most under-utilized color, so we were able to round up a lot of them.
Each student used white pencil to draw zentangle designs on their feather. We found that this worked best on the darker colors (of course), and yellow didn't really show the pencil. Oh well! We drew patterns on the yellow anyway!
Next was the hard part. . . Arranging the feathers to look like giant wings. I did this by hanging black butcher paper and using spray adhesive to attach the feathers. The spray adhesive didn't work as well as I hoped, so I had to use tape and/or glue to get them to stick. If you are hanging the mural onto a wall that can be stapled on, definitely use staples!
And finally the mural was ready to go! In addition to hanging it at the school for the Art Walk, I took a picture of each 5th grader with it to make a collage for the fifth grade teachers.
This project was definitely a lot of work, but it was all easy work. :) And the results were worth it!
Thursday, November 30, 2017
Let's Talk Color!
When my kids were babies, we read books about colors. We talked about what colors they saw as we walked through the neighborhood. We pointed at colors in our home. Color is one of the earliest concepts we teach kids. So what better place to start teaching art than with color?
I like to display this poster as a visual reminder of the elements of art, and of course, color is listed first!
Let's start with a few lessons to get you started with primary and secondary colors!
OK Go has made a fun and catchy video that teaches the primary colors, and goes into the secondary colors that can be made from each: https://youtu.be/yu44JRTIxSQ
Deep Space Sparkle is my go-to website for art lessons. You can search the website by theme, grade level, or concept. Here are a few primary color lessons from that site:
As a rule, I don't like mice, but I love the book Mouse Paint by Ellen Stoll Walsh. Here is an art project to go with it:
This art project from Art Projects for Kids turns out so cute!
Here's a hands-on activity to teach color mixing for preschoolers:
Last, but not least, is a simple primary color project inspired by Piet Mondrian. I cut the shapes out of red, yellow and blue paper. The kids then picked some shapes and glued them onto their paper. They finished the project off by painting black lines to separate the shapes.
Here's to adding a little color to a Rainy Day!
Tuesday, November 28, 2017
Maud Lewis Winter Scenes
Well, here I am again! It's only been 5 years since I last blogged. In that time, I spent my time taking care of my 3 girls and working in the school as an Art Docent. This was the perfect hobby for me. It enabled me to be in the classroom, but I didn't have to do any grades, data, assessments, or filing. . .
So now it is almost December. We just moved from Seattle, Washington, to central Maryland. Something tells me I'll be getting some real snow this year. And to be honest, I'm kind of excited about it! There's something so peaceful about snow. . . Playing in it, using it to build snowmen, taking pictures of your kids playing in it. Well, maybe not driving in it!
Here's a fun snow-themed lesson that I did with 5th grade about a folk artist named Maud Lewis. She is such an inspirational person. She suffered from rheumatoid arthritis and had no formal art training. Her mother introduced her to art the art of making watercolor Christmas cards to sell. When she got married, she lived in a tiny little house and painted almost every surface that she could find.
My inspiration for this project came from Deep Space Sparkle (https://www.deepspacesparkle.com/maud-lewis-folk-art-projects/) Kids love folk art, because it doesn't seem so daunting. Maud's artwork seems childlike and attainable. Kids at any age can be successful with this art project!
Thursday, November 29, 2012
Daily 5 (Part 2)
As I was trying to type on the computer, my 3-year-old kept climbing onto my lap begging me to read to her. (Wow, what a problem, right?!) I kept telling her that I couldn't read to her right now. She said, "But I can't read the book!" My reply brought me back to Daily 5. I said, "Read the pictures!"
In Daily 5, students are taught there are 3 ways to read a book:
-Read the words
-Read the pictures
-Retell a story
I like to keep an anchor chart with those 3 ways to read up on the wall in the classroom to remind students, no matter what reading level, that they can read!
Here is a freebie:

3 Ways to Read a Book
Happy teaching!
In Daily 5, students are taught there are 3 ways to read a book:
-Read the words
-Read the pictures
-Retell a story
I like to keep an anchor chart with those 3 ways to read up on the wall in the classroom to remind students, no matter what reading level, that they can read!
Here is a freebie:
3 Ways to Read a Book
Happy teaching!
Subscribe to:
Posts (Atom)


